




Say Goodbye to Sciatic Nerve Pain in Just 10 Minutes with This Natural Method
Say Goodbye to Sciatic Nerve Pain in Just 10 Minutes with This Natural Method referred to simply as sciatica—is one of the most debilitating physical afflictions modern adults face. It typically manifests as a sharp, shooting, or burning discomfort that originates in the lumbar spine, travels deep through the gluteal region, and radiates down through the leg. For millions of people around the globe, this severe nerve irritation disrupts sleep, ruins productivity, and drastically limits physical mobility. While traditional medical approaches often emphasize pharmaceutical pain management, corticosteroid injections, or invasive surgical interventions, there is a powerful, non-invasive alternative that addresses the mechanical root causes of sciatic distress.
If you are seeking immediate relief without reliance on prescription drugs, learning how to say goodbye to sciatic nerve pain in just 10 minutes with this natural method can be a life-changing experience. Rooted in applied biomechanics, physical therapy principles, and myofascial release, this structured natural routine targets the exact muscular compressions and spinal misalignment responsible for trapping the sciatic nerve. By spending just ten focused minutes performing gentle decompression and targeted tissue release, you can significantly reduce mechanical pressure on the nerve trunk, calm acute inflammation, and restore pain-free movement.
Understanding Sciatic Nerve Anatomy and Pathodynamics
To understand why natural mechanical decompression works so effectively, one must first appreciate the unique anatomical pathway of the sciatic nerve. As the largest and longest single nerve structure in the human body, the sciatic nerve is formed by the convergence of five distinct nerve roots originating from the lumbar and sacral segments of the spinal cord (specifically L4 through S3). These individual nerve pathways join together deep within the pelvis to form a thick, cord-like bundle roughly the width of a adult human thumb.
From its origin, the sciatic nerve exits the pelvic cavity through an opening called the greater sciatic foramen. It then travels deep beneath or directly through the piriformis muscle, runs down the back of the thigh, and branches into smaller nerves below the knee to serve the lower leg, ankle, and foot. Because this extensive neural pathway traverses multiple major joint complexes and dynamic muscle groups, any localized restriction, muscular spasm, or structural narrowing along its course can lead to nerve impingement.
When mechanical pressure is applied to the sciatic nerve, the physical sheath surrounding the nerve fibers becomes irritated. This compression impedes normal microvascular blood flow within the nerve trunk, leading to local ischemia (lack of oxygen) and cellular inflammation. The brain interprets these physiological distress signals as localized lower back pain, sharp shooting pain in the glute, numbness, tingling sensations (paresthesia), or severe muscle weakness in the leg.
Primary Underlying Causes of Sciatica Compression
While the pain signals of sciatica are universally agonizing, the primary structural trigger varies from person to person. Identifying the specific structural issue causing your pain helps tailor your recovery approach, though most mechanical causes respond exceptionally well to immediate physical decompression techniques.
Piriformis Syndrome and Muscular Entrapment
One of the most frequent yet frequently misdiagnosed triggers of sciatica is piriformis syndrome. The piriformis is a small, flat, band-like muscle located deep in the gluteal region, responsible for laterally rotating the hip joint. In approximately 15 percent of the human population, the sciatic nerve actually passes directly through the body of the piriformis muscle rather than underneath it. When the piriformis muscle experiences severe spasms, hypertrophy, or chronic tightness from prolonged sitting, it exerts direct lateral force on the sciatic nerve, causing rapid pain onset.
Lumbar Disc Herniation and Bulges
Intervertebral discs act as gel-filled shock absorbers situated between the rigid bones of the spinal column. When excessive compressive force or repetitive twisting occurs, the tough outer fibrous ring of a disc (the annulus fibrosus) can weaken or tear. This allows the soft, jelly-like inner core (the nucleus pulposus) to bulge outward into the spinal canal. When this protruding gel material touches or compresses the exiting L4, L5, or S1 nerve roots, intense sciatic pain radiates downward into the leg.
Lumbar Spinal Stenosis
Spinal stenosis refers to the gradual, age-related narrowing of the bony central canal or neuroforaminal spaces through which spinal nerves pass. This condition is often characterized by bony overgrowth (bone spurs) and thickened spinal ligaments. As spatial tolerance decreases within the spinal column, physical contact between bone tissue and sciatic nerve roots becomes frequent, particularly during standing or upright walking.
Sacroiliac (SI) Joint Dysfunction
The sacroiliac joints connect the base of the spine to the pelvic bones. If these joints become hypermobile due to ligament weakness or hypomobile due to joint fixation, the surrounding pelvic musculature immediately compensates by tightening up. This reactive muscular guarding creates secondary pressure on the nearby sciatic nerve trunk, replicating classical sciatica symptoms.
How to Say Goodbye to Sciatic Nerve Pain in Just 10 Minutes with This Natural Method
The fundamental philosophy behind this Say Goodbye to Sciatic Nerve Pain in Just 10 Minutes with This Natural Method routine is mechanical decompression coupled with dynamic neural flossing. Instead of aggressively stretching irritated tissues—which often causes nerve tissue to defensively contract further—this progressive 4-part method creates physical space within the spinal column and gently releases tight pelvic musculature.
Follow this sequential, step-by-step protocol once or twice daily to achieve optimal decompression.
       [4-Step 10-Minute Decompression Routine]

  +-------------------------------------------------+
  | Step 1: Passive Lumbar Decompression (2 Mins)  |
  | -> Relieves axial pressure on lumbar discs     |
  +-------------------------------------------------+
                          |
                          v
  +-------------------------------------------------+
  | Step 2: Target Piriformis Release (3 Mins)      |
  | -> Reduces lateral muscle trap on nerve trunk   |
  +-------------------------------------------------+
                          |
                          v
  +-------------------------------------------------+
  | Step 3: Gentle Neural Flossing (3 Mins)         |
  | -> Restores gliding mobility to nerve sheath    |
  +-------------------------------------------------+
                          |
                          v
  +-------------------------------------------------+
  | Step 4: Pelvic Reset & Stabilization (2 Mins)   |
  | -> Locks in spinal alignment to prevent relapse |
  +-------------------------------------------------+
Step 1: Passive Lumbar Decompression (2 Minutes)
The primary objective of the first phase is to eliminate gravitational compression on your lower intervertebral discs and open the neural foramina.
- Lie flat on your back on a firm surface, such as a yoga mat placed directly on the floor.
- Bend your knees at a 90-degree angle and elevate your lower legs, resting them fully on the seat of a sturdy chair, sofa, or ottomans. Your thighs should extend straight up at a 90-degree angle from your torso.
- Place your arms comfortably by your sides, palms facing upward, and close your eyes.
- Focus on deep, diaphragmatic breathing: inhale deeply through your nose for 4 seconds, allowing your abdomen to expand, and exhale slowly through your mouth for 6 seconds.
- With every exhalation, allow your lower back to sink completely into the floor, using gravity to open the intervertebral spaces of your lumbar spine naturally.
Step 2: Targeted Piriformis and Gluteal Release (3 Minutes)
Once the lower back is relaxed, the second phase releases muscular tension in the deep rotators of the hip to remove lateral entrapment.
- From the floor position, keep your uninjured or less-painful leg resting on the floor with the knee bent and foot flat.
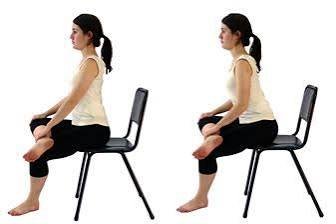
- Cross the ankle of your affected leg over the opposite knee, forming a figure-four shape with your legs.
- Gently reach through the triangular opening formed by your legs and clasp both hands behind the thigh of your uninjured leg.
- Slowly draw your uninjured thigh toward your chest while simultaneously keeping your head, shoulders, and tailbone flat on the floor.
- As you pull, you will feel a deep, satisfying stretch deep in the center of your buttock on the painful side.
- Hold this position motionless for 45 to 60 seconds while maintaining continuous, slow diaphragmatic breathing. Repeat twice.
Step 3: Gentle Sciatic Neural Flossing (3 Minutes)
Nerves are not meant to be stretched like elastic rubber bands; rather, they are designed to glide freely through surrounding muscle and fascia. Neural flossing moves one end of the nerve tract while relaxing the other, breaking up internal adhesions without triggering pain defense reflexes.
- Sit upright on the edge of a sturdy, armless chair with your feet flat on the ground and your hands resting lightly behind your back.
- Slouch slightly through your mid-back, lowering your chin to your chest.
- Slowly extend the leg on your affected side straight out in front of you while flexed at the knee, pulling your toes back toward your shin (dorsiflexion).
- As you lower the leg back down toward the floor, simultaneously lift your head up toward the ceiling.
- As you raise the leg straight out again, simultaneously lower your head back down toward your chest.
- Perform this smooth, rhythmically oscillating movement continuously for 12 to 15 slow repetitions. You should feel a dynamic tension shift rather than sharp pain.
Step 4: Pelvic Realignment and Postural Reset (2 Minutes)
The final two minutes are dedicated to realigning the pelvic bowl and re-establishing correct neural alignment so your muscles do not immediately re-spasm when you stand up.
- Lie flat on your back with knees bent and feet flat on the floor, hip-width apart.
- Perform gentle pelvic tilts: slowly tilt your pelvis backward, pressing your lower back flat into the floor, engaging your deep core muscles for 3 seconds.
- Slowly arch your lower back slightly, creating a tiny gap between your back and the floor, holding for 3 seconds.
- Repeat this gentle rocking motion 10 times.
- Roll carefully onto your side using your arms to push yourself up to a seated position, avoiding sudden twisting movements as you stand up.
Biomechanical Mechanics: Why This Natural Method Delivers Fast Results
The underlying reason you can say goodbye to sciatic nerve pain in just 10 minutes with this natural method lies in basic neuromuscular physiology. When a peripheral nerve is subjected to mechanical irritation, the central nervous system responds by initiating protective muscle guarding. The brain instructs surrounding muscle fibers—specifically the erector spinae, quadratus lumborum, and piriformis—to contract aggressively to immobilize the area.
Unfortunately, this protective spasm creates a vicious cycle: the tight muscle fibers exert even greater physical compression on the sciatic nerve, worsening the ischemia and amplifying the acute pain signals sent back to the brain.
       +--------------------------------------------+
       | Initial Nerve Irritation / Compression     |
       +--------------------------------------------+
                             |
                             v
       +--------------------------------------------+
       | Brain Triggers Protective Muscle Guarding   |
       +--------------------------------------------+
                             |
                             v
       +--------------------------------------------+
       | Increased Pressure & Reduced Blood Flow   |
       +--------------------------------------------+
                             |
                             v
       +--------------------------------------------+
       | Pain Signals Escalate (Vicious Cycle)      |
       +--------------------------------------------+
By introducing passive traction, targeted muscular release, and neural flossing, you directly intervene in this neurological pain loop:
- PNS Inhibition: Slow, sustained stretches (held beyond 30 seconds) stimulate the Golgi Tendon Organs (GTO) within tight muscles. The GTO sends inhibitory signals to the spinal cord, forcing hyper-tonic muscle fibers to relax automatically.
- Hydrodynamic Re-hydration: Decompressing the lumbar spine creates a negative pressure differential inside the intervertebral space. This vacuum-like effect helps pull bulged disc material away from nerve roots and draws nutrient-rich fluid back into the spinal disc.
- Restorations of Axoplasmic Flow: Neural flossing breaks micro-adhesions along the nerve sheath, restoring normal fluid transport (axoplasmic flow) within the nerve trunk itself, which immediately reduces nerve hypersensitivity.
Lifestyle Modifications to Prevent Sciatica Recurrence
While rapid natural decompression offers fast, effective relief, long-term spinal wellness requires proactive daily management. Implementing key ergonomic adjustments ensures that sciatic nerve pain does not return during daily activities.
| Lifestyle Area | Risk Factor | Corrective Action |
| Ergonomics | Prolonged sitting with posterior pelvic tilt | Use lumbar support pillows; ensure hips are slightly elevated above knees. |
| Physical Activity | Weak core and gluteal amnesia | Engage in daily low-impact walking and core-stabilization exercises (e.g., Bird-Dog). |
| Hydration | Dehydrated intervertebral discs | Consume adequate daily water to maintain optimal disc height and cushion. |
| Footwear | High heels or unsupported thin soles | Wear shoes with neutral arch support to maintain natural pelvic tilt. |
| Sleeping Position | Spinal twisting during sleep | Sleep on back with a pillow under knees, or side with a pillow between knees. |
Core Muscle Stabilization
The human lumbar spine relies entirely on surrounding muscular structures for structural integrity. Weak abdominal muscles, inactive gluteal groups, and tight hip flexors shift the body’s center of gravity forward, forcing the lower back muscles to work continuously. Incorporating isometric core exercises—such as the bird-dog, side planks, and abdominal bracing—builds a protective internal corset that stabilizes the lumbar spine during movement.
Ergonomic Seating Practices
Prolonged sitting is undoubtedly one of the most damaging daily habits for sciatic health. When seated, the pressure placed on lumbar intervertebral discs increases by nearly 40 percent compared to standing upright. If your daily work requires sitting at a desk, use an ergonomic chair that supports the natural inward curve (lordosis) of your lower back. Stand up, stretch, and walk around for at least 2 to 3 minutes for every 45 minutes of continuous desk work.
When to Seek Immediate Medical Evaluation
While the natural decompression protocol outlined in this article is safe, gentle, and effective for the vast majority of mechanical sciatica cases, certain clinical signs indicate potential structural emergencies that require immediate medical evaluation by a physician or orthopedic surgeon.
🚨 Critical Red Flag Symptoms:
You should seek immediate emergency medical evaluation if you experience any of the following:
- Loss of Bowel or Bladder Function: Sudden inability to urinate, loss of sphincter control, or urinary retention. This is a primary sign of Cauda Equina Syndrome, a rare surgical emergency caused by severe compression of the spinal sac.
- Saddle Anesthesia: Progressive loss of physical sensation or complete numbness in the groin, buttocks, or inner thighs.
- Motor Foot Drop: Sudden inability to lift your foot at the ankle (dorsiflexion), causing your toes to drag along the ground while walking.
- Progressive Motor Weakness: Rapidly advancing weakness in both legs, making standing upright or supporting your body weight impossible.
Frequently Asked Questions (FAQs)
Can I practice this 10-minute method if I have an acute lumbar herniated disc?
Yes, provided you do not move into positions that cause sharp, worsening peripheral pain. Step 1 (Passive Lumbar Decompression) and Step 3 (Neural Flossing) are specifically designed to be gentle on disc injuries because they decompress the lumbar spine without requiring deep forward bending of the spinal column. Always listen to your body and discontinue any movement that sharpens nerve pain.
How often should I perform this natural routine for optimal results?
For acute flare-ups, performing this routine 2 times per day (once in the morning after waking up and once in the evening before bed) yields excellent results. For long-term maintenance and prevention, completing the routine 3 to 4 times a week is generally sufficient to keep pelvic musculature relaxed and the sciatic nerve moving freely.
Is it normal to feel a mild pulling sensation during the stretches?
Yes, a mild, broad pulling sensation deep within the gluteal muscles or along the back of the thigh is completely normal and indicates that hyper-tonic tissue is loosening. However, you should never experience sharp, electric, shooting, or burning sensations during the routine. If you feel sharp symptoms radiating further down your leg, reduce the depth of your stretch immediately.
What is the difference between true sciatica and pseudo-sciatica?
True sciatica originates directly at the spinal nerve roots in the lumbar spine, usually caused by disc herniation, bone spurs, or spinal canal narrowing. Pseudo-sciatica originates outside the spinal canal, most commonly caused by trigger points and severe muscle tightness within the piriformis or gluteus medius muscles compressing the peripheral nerve. Both conditions respond exceptionally well to targeted natural decompression.
How long does it usually take to recover completely from sciatic flare-ups?
With consistent application of natural mechanical decompression, Say Goodbye to Sciatic Nerve Pain in Just 10 Minutes with This Natural Method proper posture, and light walking, many acute muscular sciatica flare-ups resolve or significantly improve within 1 to 2 weeks. Structural sciatica related to disc herniation may take anywhere from 4 to 8 weeks to heal fully as surrounding tissue inflammation subsides naturally.
Conclusion
Sciatic nerve pain does not have to dictate your physical freedom, disrupt your sleep, or force you into a lifetime of managing discomfort. By understanding the underlying mechanics of nerve compression and implementing targeted physical decompression, you can directly address the root structural causes of your pain.